
In this new Metasploit Hacking Tutorial we will be enumerating the Metasploitable 2 virtual machine to gather useful information for a vulnerability assessment. Enumeration in mathematics or computer science is referred to as listing a number of elements in a set. Enumeration in the hacking context is the process of retrieving usernames, shares, services, web directories, groups, computers on a network. This is also called network enumeration. During this process we will also collect other useful network related information for conducting a penetration test. An important part of the Metasploitable 2 enumeration process is the port scanning and fingerprinting process. Port scanning is used to probe a server or host for open TPC and UDP ports. Fingerprinting is the process of identifying the services connected to those ports. A very popular tool used for network enumeration, port scanning and fingerprinting is NMap (Network Mapper) which we will be using throughout this tutorial. We will also use an enumeration tool called enum4linux. Enum4linux is a tool used for enumerating information from Windows and Samba hosts.
After we’ve successfully completed enumerating the Metasploitable 2 VM we will be doing a vulnerability assessment on the network side in the next tutorial. With information retrieved from the enumeration process, for example the operating system version and running services with version, we will be looking for known vulnerabilities in these services. We will be using the Open Source Vulnerability Database (OSVDB) and the Common Vulnerabilities and Exposures (CVE) for this purpose. The last step is to scan the target host for these vulnerabilities with a vulnerability scanner called OpenVAS on Kali Linux.
Metasploitable 2 enumeration and port scanning
In this part of the Metasploitable 2 enumeration tutorial we will be enumerating the running services, accounts and perform an open port scan. We will be using NMap to scan the virtual machine for open ports and we will be fingerprinting the connected services. In this tutorial we will only be focussing on enumerating the network side of the Metasploitable 2 machine. We will cover the web side in a different tutorial where we will be enumerating web applications and directories, performing SQL injection attacks and exploit the vulnerable web services.
I assume you have already installed the Metasploitable virtual machine (Search this tutorial on this blog) from the previous tutorial and if it is not running by now it is time to fire it up now. When you login to the vulnerable host with msfadmin as username and password you can use the ifconfig command to determine its IP address. You can also use netdiscover on the Kali linux machine to scan a range of IP addresses for the target host. Use the following command on the terminal:
Netdiscover –r 192.168.111.0/24
This command will return all live host on the given IP range, from 192.168.111.0 to 192.168.111.255 in our example. Off course you should scan the IP range your Metasploitable 2 VM installation is located on your own network.
The netdiscover –r 192.168.111.0/24 command discovers all IP addresses in the given range.
Nmap port scan and service scan
We will start the open port scan with scanning the target host with NMap. We will use a TCP SYN scan for this purpose and than we will scan the target for open UDP ports. The SYN scan is known as a stealthy port scan because it does not finish the full TCP handshake. A full TCP connection starts with a three way handshake where a SYN packet is send by NMap as the first part of the handshake. When a port on the target machine is open, it will respond with a SYN-ACK packet. When there is no response from the target on the first SYN packet, than the port is either closed or filtered by a firewall. The 3rd step in this process is the host machine that should respond to the SYN-ACK with an ACK packet to complete the full TCP handshake. In the case of a SYN scan its never does and is therefore called stealthy.
When you start a SYN scan (and any other port scan) from NMap without specifying the port range then NMap will scan only the first 1.000 ports which are considered the most important ports instead of all 65.535 ports. To scan all ports you have to use the -p- flag. The Nmap SYN scan command uses the -sS flag as used in the following command to SYN scan port 1 to port 65.535:
nmap -sS -p- [taget IP address]
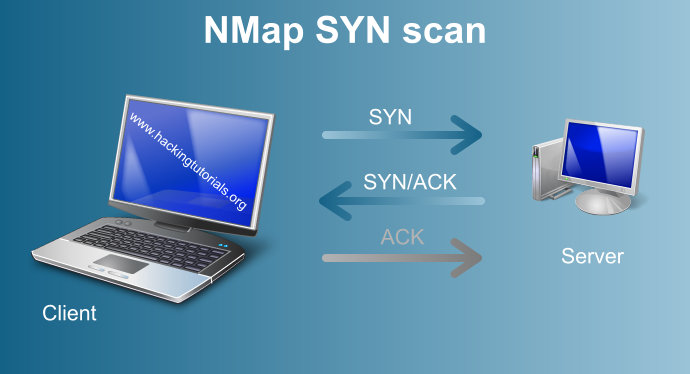
A SYN scan does not complete the three way TCP handshake because the SYN/ACK packet is not responded to with an ACK packet.
The Nmap SYN scan is often called a stealthy scan which implies that it goes unnoticed. This is true for old firewalls, which only log full TCP connections, but not for modern firewalls which also log uncompleted TCP connections.
Are open ports vulnerable?
Just because a port is open doesn’t mean that the underlying software is vulnerable. We need to know the version of the operating system and running services. With this information we can determine if there are known vulnerabilities available to be exploited. The result of the service and OS scan will give us the right information to investigate further during the vulnerability assessment. To get this information we’ll run the port scan with the -sV option for version detection and the –O option for OS detection to retrieve the versions of the running services and the OS. The Nmap OS and Version scan does complete the full TCP handshake and using techniques like banner grabbing to get information from the running services.
You can also use the –A option instead of –O to enable OS Detection, version detection, script scanning and trace route all at once. This is not a stealthy way of scanning.
Nmap Service scan with OS detection
Use the following command to start the Nmap port scan with service and OS detection:
Nmap –sS –sV -O [target IP address]
After running this command NMap will return a list of open ports and the connected services:
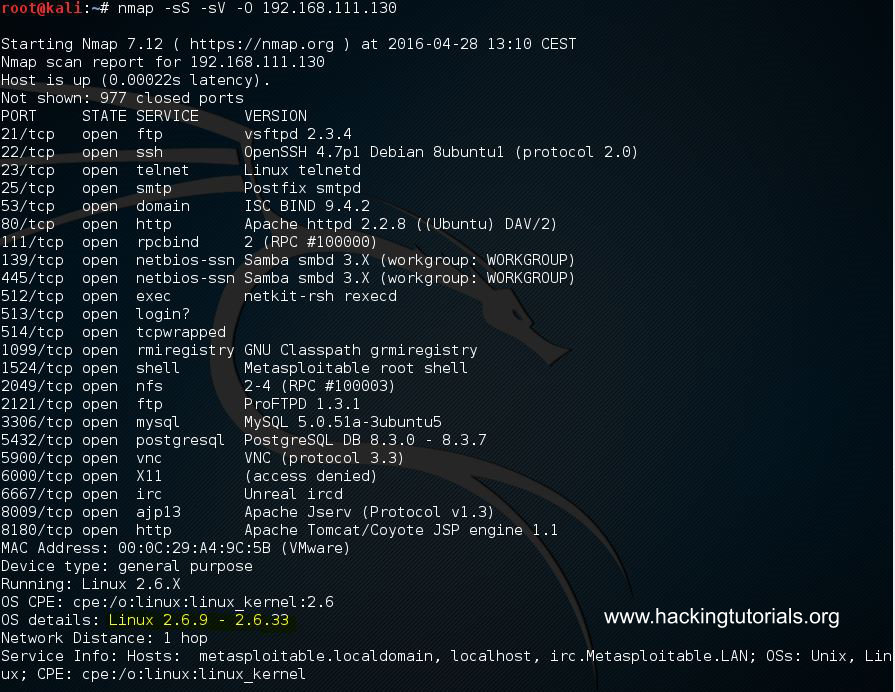
Metasploitable 2 port scan with service and OS scan
The Nmap port and service scans returns a lot of open ports, listening services and the version of the operating system. The target host is running Linux 2.6.9 – 2.6.33 as operating system. We can see that the host is running an SSH service using OpenSSH, a telnet service, an Apache 2.2.8 webserver, 2 SQL servers and some more services. Let’s sum all services with version and port in a list we’ve be using in the next chapter where we’ll do a vulnerability assessment and look for common vulnerabilities:
- Vsftpd 2.3.4 on open port 21
- OpenSSH 4.7p1 Debian 8ubuntu 1 (protocol 2.0) on open port 22
- Linux telnetd service on open port 23
- Postfix smtpd on port 25
- ISC BIND 9.4.2 on open port 53
- Apache httpd 2.2.8 Ubuntu DAV/2 on port 80
- A RPCbind service on port 111
- Samba smbd 3.X on port 139 and 445
- 3 r services on port 512, 513 and 514
- GNU Classpath grmiregistry on port 1099
- Metasploitable root shell on port 1524
- A NFS service on port 2049
- ProFTPD 1.3.1 on port 2121
- MySQL 5.0.51a-3ubuntu5 on port 3306
- PostgreSQL DB 8.3.0 – 8.3.7 on port 5432
- VNC protocol v1.3 on port 5900
- X11 service on port 6000
- Unreal ircd on port 6667
- Apache Jserv protocol 1.3 on port 8009
- Apache Tomcat/Coyote JSP engine 1.1 on port 8180
Most of the running services scanned by Nmap will probably be vulnerable.
Of course we know the Metasploitable 2 virtual machine is intentionally vulnerable. Therefor one can only suspect that most, if not all, of the services contain vulnerabilities, backdoors etc. In this hacking tutorial we will only cover enumeration tactics, port scanning and a vulnerability assessment on the network side. In the Metasploitable tutorials to follow we will be exploiting the vulnerabilities. Let’s continue with user enumeration.
Nmap UDP scan
So far we’ve only scanned for open TCP ports, which is the default for Nmap, and not for open UDP ports. Let’s use the following command to start an UDP scan:
nmap -sU 192.168.111.128
We can also use the -p flag to define ports to be scanned. The UDP scan will take some more time to finish than a TCP scan. Nmap return the following information about the open UDP ports it has found:
PORT STATE SERVICE
53/udp open domain
111/udp open rpcbind
137/udp open netbios-ns
2049/udp open nfs
53/udp open domain
111/udp open rpcbind
137/udp open netbios-ns
2049/udp open nfs
Please note that UDP scans may cause a lot of false positives. The false positives may occur because UDP lacks an equivalent of a TCP SYN packet. When a scanned UDP port is closed the system will respond with a ICMP port unreachable message. The absence of such package indicates that the UDP port is open for many scanning tools. When a firewall is present on the target host which blocks the ICMP unreachable message than all UDP ports appear to be open. When the firewall blocks a single port the scanner will also falsely report that the port is open.
Metasploitable 2 user enumeration
User enumeration is an important step in every penetration test and should be done very thoroughly. With user enumeration the penetrations tester gets to see what users have access to the server and which users exist on the network. Another purpose for user enumeration is for gaining access to the machine by using brute force techniques. Since the username is already known to the penetration tester the only thing left to brute force is the password. There are multiple ways of enumerating users on a Linux system. We will be looking at 2 different methods:
- Enumerating users using a Nmap script named smb-enum-users.
- Enumerating users through a null sessions using rpclient.
Let’s start with enumerating users using the NMap script.
Enumerating users with NMap
In order to enumerate the user accounts available on the target machine we will be using the following Nmap script: smb-enum-users. We can run the NMap script by using the following command:
nmap --script smb-enum-users.nse –p 445 [target host]
The script output is a long list of available users on the host:
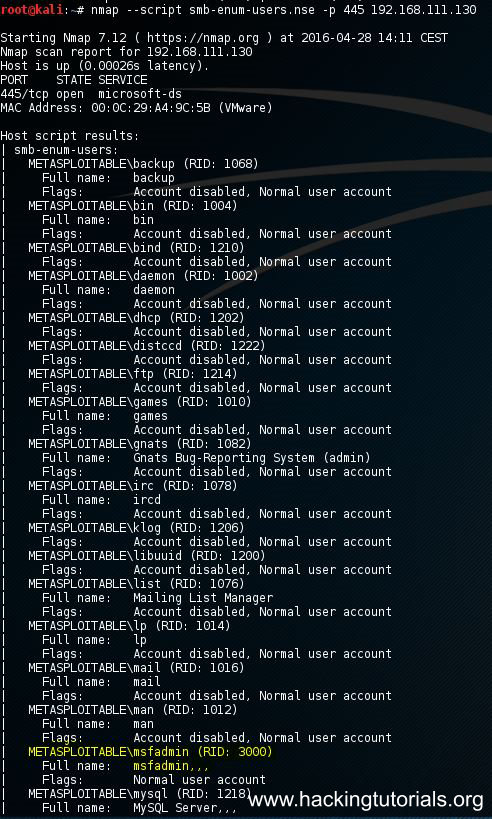
As you can see there are a lot of usernames on the Metasploitable 2 machine. Among them are a lot of service accounts and the admin account which is named msfadmin. Let’s have a look at the second method to retrieve a list of user accounts from the Metasploitable 2 server by using a null session on the Samba server.
Enumerating user accounts through null sessions with rpcclient
Rpcclient is a Linux tool used for executing client side MS-RPC functions. A null session is a connection with a samba or SMB server that does not require authentication with a password. No username or password is needed to set-up the connection and therefore it is called a null session. The allowance of null sessions was enabled by default on legacy systems but has been disabled from Windows XP SP2 and Windows Server 2003. The connection uses port 445 which is an open port on out target host as we’ve seen in the results of the port scan.
Let’s open up a new terminal window and set up a null session with the Metasploitable 2 samba server using the following command:
rpcclient –U “” [target IP address]
The –U option defines a null username followed by the IP address of the Metasploitable 2 VM. You will be asked for a password, just press enter to continue:

Start a null session using rpcclient
The command line will change to the rpcclient context which is indicated by the rcpclient $> on the command line. Now run the following command in the rpcclient context:
rcpclient $> querydominfo
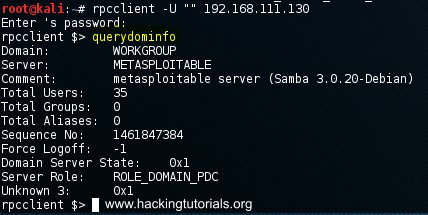
querydominfo
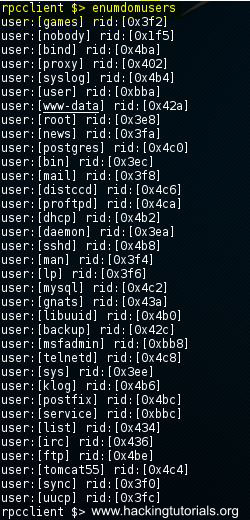
The querydominfo command returns the domain, server, the total users on the system and some other useful information. The result shows us there are a total of 35 user accounts available on the target system. Now run the following command to retrieve a list of these 35 users:
rcpclient $> enumdomusers
enumdomusers
The result is a list of all user accounts available on the system. Now that we know which user accounts are available on the server we can use the rpcclient to query the user info for more information using the following command:
rcpclient $> queryuser [username]
Let’s query the user info for the msfadmin account with the following command:
rcpclient $> queryuser msfadmin
This will return information about the profile path on the server, the home drive, password related settings and a lot more. This is great information which can be queried without administrator access! If you want to learn more about how to use the rpcclient just type the help command for an overview of available options.
Use the netshareenum command on Metasploitable 2 to enumerate its network shares.
Enumeration with enum4linux
Enum4linux is used to enumerate Windows and Samba hosts and is written in Perl. The tool is basically a wrapper for smbclient, rpcclient, net and nmblookup. Let’s have a look at how to use enum4linux and run it on Metasploitable 2. Below are the most common options used in enum4linux. To get an overview of different options use the --help flag.
Usage: ./enum4linux.pl [options]ip-U get userlist
-M get machine list*
-S get sharelist
-P get password policy information
-G get group and member list
-d be detailed, applies to -U and -S
-u user specify username to use (default “”)
-p pass specify password to use (default “”
-a Do all simple enumeration (-U -S -G -P -r -o -n -i).
-o Get OS information
-i Get printer information
Let’s run enum4linux on Metasploitable 2 with all options using the following command:
enum4linux 192.168.111.128
After enum4linux has finished it returns us a lot of useful information. We got an overview of the shares available on our target host:
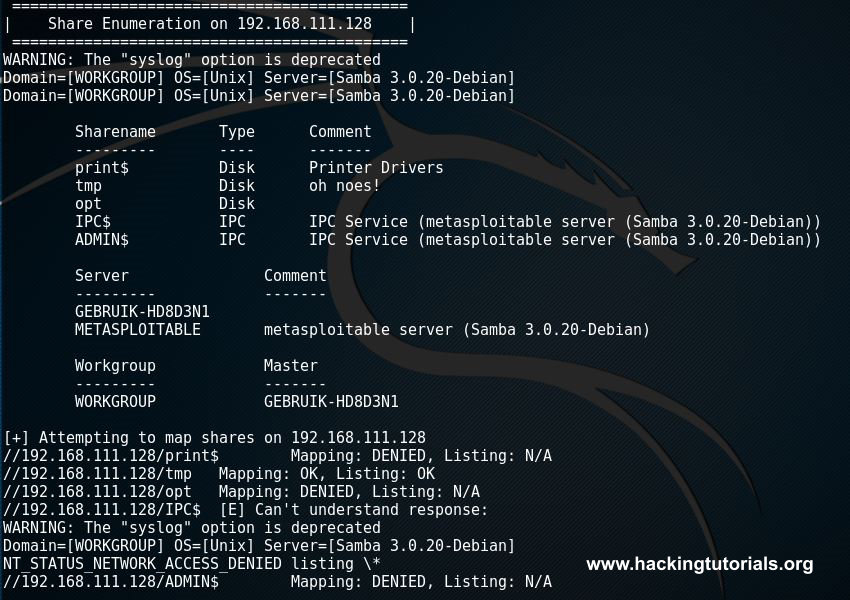
enum4linux shares
And also an overview of the available users:
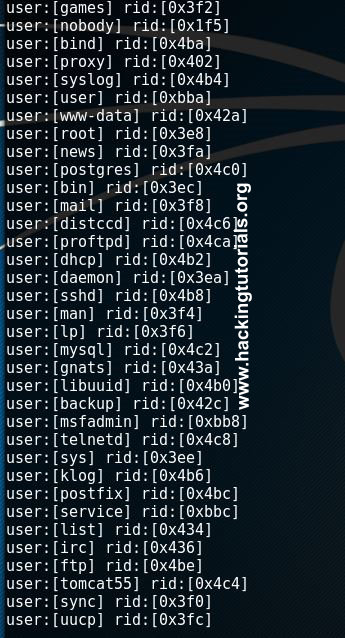
enum4linux users
And the following information about the operation system:

enum4linux OS information
So far we have collected information about the operating system, the user accounts, open ports and the running services with version numbers in this Metasploitable 2 enumeration tutorial. We also collected information about the password policy (there is none) which raises questions about the used password strength which we will investigate during the exploitation phase. We’ve used tools like Nmap, rpcclient and enum4linux to gather all this information. For now we can use this information for a vulnerability assessment which we will be doing in the next Metasploit tutorial.

0 comments:
Post a Comment