Showing posts with label HOW TO. Show all posts

Metasploit and Metasploitable 2 installation


In this new Metasploit tutorial we will be installing and configuring Metasploit on Kali Linux and the Metasploitable 2 virtual machine on VMware Player. Metasploit is one of the most popular and top rated penetration testing tools on the market and is designed for penetration tests, vulnerability assessments and developing and executing exploit code against remote targets. Metasploit is an open source project available in a free Metasploit Framework and community version and there is a paid pro version which even contains more features. Metasploit has several user interfaces, both command line and graphical user interfaces. Armitage is the graphical attack management tool which visualizes targets and is recommending exploits for known vulnerabilities. In this tutorial and the ones to following, we will be using the free Metasploit framework edition which is installed by default on the latest version of Kali Linux. If you have no or little experience with command lines and Metasploit we recommend you to read the Metasploit commands tutorials as well.
When you need to learn how to swim you need a swimming pool and when you need to learn how to hack you need vulnerable machines to practice on. Metasploitable 2 is that swimming pool that ethical hackers can use to learn about ethical hacking without breaking any laws and regulations or the need to use production networks as a lab. Metasploitable 2 is an intentionally vulnerable Linux machine which can be downloaded and setup as a virtual machine in any hypervisor such as VMware Player and Virtual box. In the Metasploitable 2 tutorial we will be setting up the vulnerable Linux machine in VMware Player. In the upcoming tutorials we will be using the Metasploitable 2 vm to practice on and guide you through the process of hacking it using Metasploit on Kali Linux.

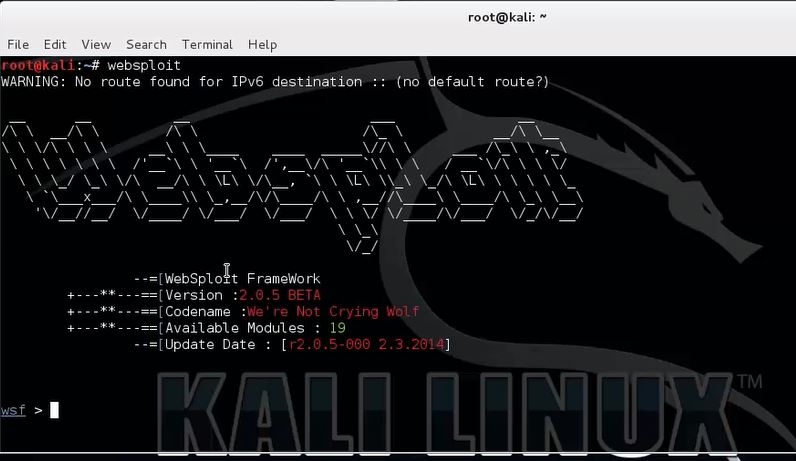
Setting up Metasploit on Kali Linux 2016 Rolling

When you’re running the latest version of Kali Linux, currently that is the 2016 rolling edition, you just need to click the Metasploit icon on the dock. This will start the PostrgreSQL service, the Metasploit service and msfconsole automatically. When you launch Metasploit for the first time it will set-up and configure the Metasploit database.

Setting up Metasploit on Kali Linux before 2016 Rolling edition

In order to use Metasploit on any Kali Linux version before 2016.01 Rolling edition you need to do 3 things:
  • Start the Kali PostgreSQL service.
  • Start the Kali Metasploit service.
  • Start the msfconsole.
To start the PostgreSQL service we need to issue the following command in the terminal:
service postgresql start
Then use the following command to start the Metasploit service:
service metasploit start
And the following command to start msfconsole:
msfconsole
Setting up Metasploit and Metaspoitable 2 - msfconsole 5
Now use the following command to check if there is a database connection:
msf > db_status
If you want to start the PostgreSQL and Metasploit service at boot time you need to edit the update-rc.d by using the following commands:
update-rc.d postgresql enable
update-rc.d metasploit enable

Metasploitable 2 installation and configuration

First we need to download the Metasploitable 2 virtual machine which contains the vulnerable host machine we will be practicing on in the upcoming tutorials. Make sure you have sufficient resources on your host system for installing and running the virtual machine. You need to have at minimum 10 gigabytes of storage space and enough RAM for your host system, the Metasploitable host and Kali linux if you’re running Kali in a VM on the same host. The Metasploitable 2 download is available from Sourceforge using the following link:
After unzipping the downloaded ZIP file you need to open the virtual machine from VMWare Player:
Metaspoitable 2 - VMware player 1
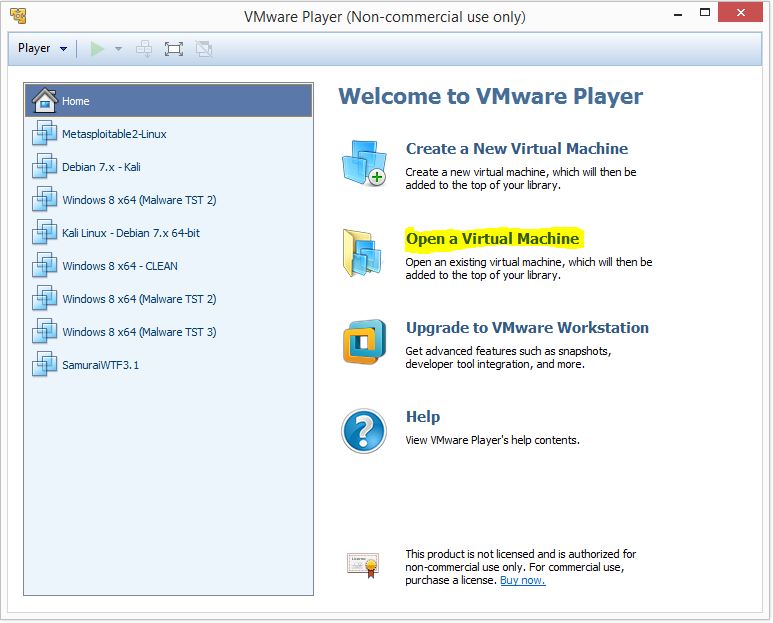
Browse to the folder where you have unzipped the Metasploitable 2 image and add it to your VM list by selecting the .vmx file. The new VM will appear in the list on the left side of the window and is named Metasploitable2-Linux. We do not need to change the Virtual Machine settings so we can start the VM right away by selecting the new VM and click “Play Virtual Machine”:
Metaspoitable 2 - VMware player 2
VMWare played might ask you if you have copied or moved the Virtual Machine, click the copied button to continue. Metasploitable 2 will configure itself and present you with a login screen as following:
Metasploitable 2
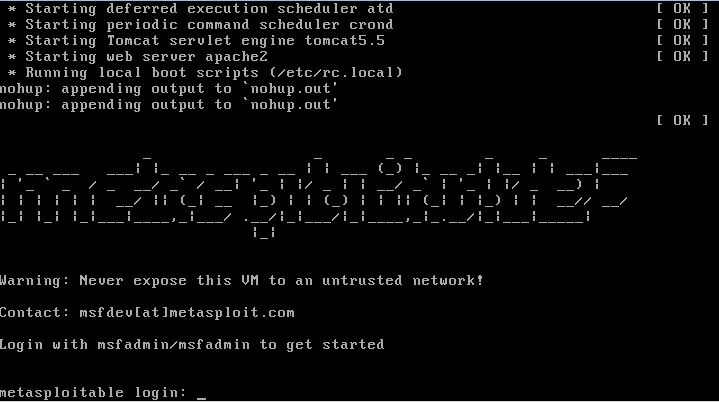
Login to the virtual machine by using the following credentials:
Username: msfadmin
Password: msfadmin
Virtual Hacking Labs - Penetration testing lab
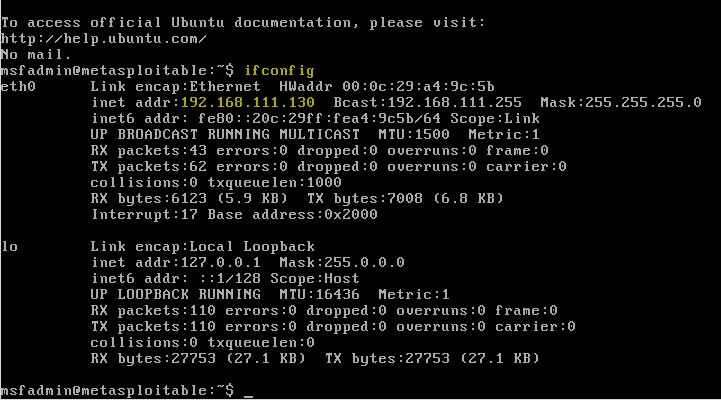
Now that our vulnerable Linux machine is running and we can type the ifconfig command to retrieve the IP address of the Metasploitable 2 virtual machine:
msfadmin@metasploitable:~$ ifconfig
The IP address will appear on the eth0 network adapter as following:
Metaspoitable 2 - IP Address 4
So far we are done with configuring the vulnerable virtual machine and we can switch back to Kali Linux to run some scans on the vulnerable host to determine open ports and running services.
If you are unfamiliar with the Metasploit command line interface and the MSFConsole at this point of the tutorial I recommend you to read the Metasploit basic commands tutorial first before proceeding.
Are you ready to exploit different vulnerabilities and root Metasploitable 2? Follow any of these tutorials:
Share:

Websploit Wifi Jammer


In this tutorial we will be exploring the Websploit Wifi Jammer module which we’ve edited to work with the latest version of Kali Linux. The Websploit Wifi Jammer module is a great tool to automatically disconnect every client connected to the targeted wireless network and access point. The WiFi Jammer module also prevents new and disconnected clients from connecting to the WiFi network. The module has been edited to work with Kali 2.0 and the new monitoring interface names (wlan0mon, wlan1mon etc.). For your convenience we’ve also set wlan0mon as the default interface. The edited Websploit Wifi Jammer module script can be downloaded using the following link:
In order to work with the new script in Websploit you have to replace the script in the following directory in Kali Linux with the downloaded script:
/usr/share/websploit/modules/wifi_jammer.py

Websploit WiFi Jammer Tutorial

Open a new terminal and start websploit with the following command:
websploit
Websploit Wifi Jammer -1
Use the following command to show an overview of available modules from which we will select the Websploit WiFi Jammer module:
show modules
Websploit Wifi Jammer modules
Select the wifi/wifi_jammer module.
Use the following command to set the wifi/wifi_jammer module from the Wireless / Bluetooth modules section so we can configure the necessary parameters:
use wifi/wifi_jammer
Type the following command to show the available options for the Websploit WiFi Jammer module:
show options
Websploit Wifi Jammer Module Parameters
We need to specify the target’s BSSID, ESSID and the channel on which the access point is broadcasting. Also change the wireless interface and monitoring interface if needed. The default values for these parameters have been set to wlan0 and wlan0mon according the new naming format.
To determine the target’s BSSID, ESSID and channel you can use a tool like aircrack-ng or similar. It is beyond the scope of this tutorial to explain this process in detail. The following tutorials teach you how to use Airodump-ng which provide you with the necessary details (or watch the video tutorial at the bottom of this post):
Use the following set command in Websploit to set the parameters:
set BSSID [BSSID]
set ESSID [ESSID]
set channel [channel number]
Now type run to start the WiFi Jammer module on the specified target:
run
Websploit Wifi Jammer Running
Websploit Wifi Jammer running on the selected target.
Websploit Wifi Jammer disconnected
Disconnected and unable to connect again.
The Websploit WiFi Jammer module uses airodump-ng to determine connected clients and aireplay-ng to spam deauth messages to those connected clients. As you can see on the last screenshot we are disconnected on a Windows host and unable to connect again. This will remain this way until we stop the WiFi Jammer and close the aireplay-ng windows.
We’ve mentioned ‘connected clients’ a couple times throughout this tutorial. Note that a connected client can be anything from a regular desktop PC to WiFi Security cameras, home automation systems and any other system using WiFi for data transmission and operation. This is one of the many reasons why you should not us critical devices on wireless networks but use wired networks instead.

Share:

Metasploit CVE-2015-5122 Flash Exploit Tutorial


In this tutorial we will be importing the CVE-2015-5122 (Adobe Flash opaqueBackground Use After Free) zero day Flash Exploit module in Metasploit and have a vulnerable setup download the malicious Flash file. Recent versions of Adobe Flash Player contain critical vulnerabilities within the ActionScript 3 ByteArray, opaqueBackground and BitmapData classes. Exploiting one of these vulnerabilities could allow a remote attacker to execute arbitrary code on the vulnerable system. CVE-2015-5122 is the 3rd zero-day exploit from the Hacking Team data breach and targets the Adobe Flash Player (18.0.0.203) on Windows 7, Windows 8.1 and Google Chrome on Linux based computers. By the time of writing Adobe has already released security updates for Windows, Mac and Linux. This tutorial is for informational purposes only.

Metasploit CVE-2015-5122 Tutorial

First download the exploit code and make it available to Metasploit by creating an empty document and name it:
Adobe_Flash_HackingTeam_exploit.rb
Than download the payload here:
And add it to the following directory:
/usr/share/metasploit-framework/data/exploits/CVE-2015-5119/msf.swf
Now copy the exploit code and paste it into the document.
Metasploit CVE-2015-5122 Flash Exploit 1
Use the following command to copy the file from the desktop to the Metasploit modules folder (create the flash folder first if needed:
mv /root/Desktop/Adobe_Flash_HackingTeam_exploit.rb /usr/share/metasploit-framework/modules/exploits/windows/flash/
Use the following command to check if the file has been actually copied to the destination folder:
ls /usr/share/metasploit-framework/modules/exploits/windows/flash/
Metasploit CVE-2015-5122 Flash Exploit 2
Let’s open a new terminal and start Metasploit (and services if not already started) using the following command(s):
service postgresql start
service metasploit start
msfconsole
Metasploit CVE-2015-5122 Flash Exploit 3
Now we’ve got Metasploit up and running with our newly imported exploit loaded, we use the following command to search for it:
search hackingteam
Now use the following command to use the newly added exploit:
use exploit/windows/flash/Adobe_Flash_HackingTeam_Exploit
Let’s check the options for Metasploit CVE-2015-5122 module with the following command:
show options
Metasploit CVE-2015-5122 Flash Exploit 4
We will keep the default options and type “run” or “exploit” to start the exploit:
exploit
Metasploit CVE-2015-5122 Flash Exploit 5
Let’s open the link from a Windows 8.1 virtual machine with a vulnerable browser (Firefox) and a vulnerable version of Flash Player (18.0.0.203) installed.
Metasploit CVE-2015-5122 Flash Exploit 6
How to avoid getting infected by CVE-2015-5122 and other exploits…
– Update Flash Player and keep it up-to-date.
– Install security patches and keep your OS up-to-date.
– Install a virus scanner and firewall and keep it updated.
– Keep your browser up-to-date.
– Do not install unneeded plug-ins.

Share:

Websploit Cloudflare Resolver module


In this tutorial we will be testing and using the Cloudflare resolver module in Websploit on Kali Linux. Cloudflare is a company that provides a content delivery network and distributed DNS (Domain Name Server) services, sitting between the visitor and the hosting provider of the Cloudflare user. This way Cloudflare is acting as a reverse proxy for websites and claims to protect, speed up, optimize and improve availability for a website. Cloudflare also provides advanced DDOS protection for a website, including those targeting UDP and ICMP protocols. Cloudflare claims to protect more than 2 million website at the time of writing. The Websploit Cloudflare Resolver module claims to resolve the original IP address of the server protected by Cloudflare.

Websploit Cloudflare Resolver Tutorial

Open a terminal and start websploit with the following command:
websploit
Use the following command to show an overview of available modules from which we will select the Websplout Cloudflare Resolver module:
show modules
Websploit Cloudflare Resolver Module Tutorial 1
Use the following command to set the cloudflare_resolver module so we can configure it’s parameters:
use web/cloudflare_resolver
Type the following command to show the available options for the Websploit Cloudflare Resolver module:
show options
We need to specify a hostname as target:
Websploit Cloudflare Resolver Module Tutorial 2
We will use the following command to set a target:
set target [hostname]
Now type the Run command to run the Websploit Cloudflare Resolver module against the specified target.
Websploit Cloudflare Resolver Module Tutorial 3
Hackingtutorials.org is not using Cloudflare so it will display the webserver’s real IP address. I tried this module on a couple websites using Cloudflare and it returns the Cloudflare IP address mostly. This module does return the IP addresses for sub-domains and sometimes this gives you useful information and non Cloudflare IP addresses but this could also be done by a simple ping on subdomains.

Share:

Websploit Directory Scanner – Scanning webserver directories

In the next few tutorials I will explain how to use the different Websploit modules. WebSploit is an open source project for web application assessments. In this tutorial we will be using the websploit directory scanner module and we will add some custom directories. Websploit directory scanner is a script which scans webservers for directories listed in the script and tells you they exist or not.
Due to many errors generated by the script, mostly 400 Bad Request errors on existing directories, I have edited the script. the issues causing the 400 Bad Request errors have been fixed now. I’ve also added a verbosity option so you can choose whether you just want to see existing directories or errors too. Code 302 Found is coloured green now instead of yellow. The new script can be downloaded here (save as):

Replace the script in the following directory in Kali Linux:
/usr/share/websploit/modules/directory_scanner.py

Websploit Directory Scanner

Let’s open a terminal and start Websploit with the following command:
websploit
Websploit start
Use the following command to view the list of available Websploit modules:
show modules
Websploit Modules
Module web/dir_scanner scans the target for common web directories. Use the following command to set web/dir_scanner:
use web/dir_scanner
Use the following command to show available options for the used module:
show options
Websploit show options
Use the following command to set the target:
set target [url]
And the following command to set the verbosity level:
set verbosity 1
Verbosity 0 = Show found directories (302 found and 200) only
Verbosity 1 = Show all
Now type Run to run the module against the selected target:
run
Websploit run directory scanner

Adding custom directories to Websploit Directory Scanner

Open the following file:
/usr/share/websploit/modules/directory_scanner.py
Add your directories to the following lines:
websploit directory Scanner custom dirs
Make sure you use this format: ‘/wp-admin/’,
Share:

How to track VICTIM's mobile and VICTIM's Location


পুলিশ আপনার সিমের ২ টি অংশ চেক করে

এখন আগেই বিস্তারিত পড়ার দরকার নেই। এরপর আরো ২ টা জিনিস আছে যেগুলো হলো:
  • এমসিসি  (MCC  Mobile Country Code)
  • এমএনসি (MNC  Mobile Network Code)

এটি কিভাবে শো করে দেখুন :


এখানে MCC হচ্ছে 470
MNC হচ্ছে ০১ অর্থাত গ্রামীন ফোন। বাংলাদেশের প্রত্যেকটি অপারেটর এর আলাদা কোড আছে।


এবার দেখুন ম্যাপ লোকেশন


এখানে নীল রঙ্গের ২ টি পিড়ামির রয়েছে, একটি সিম ১ ও অন্যটি সিম ২। এই দুটি টাওয়ারই আমি ব্যবহার করছি এবং এ দুটি টাওয়ার এর যে নাম্বার এই দুটি নাম্বারই হচ্ছে আমার বা আপনার লোকেশন নাম্বার।


এখন প্রশ্ন হচ্ছে কিভাবে আপনি আপনার CID and Lac আইডি বের করবেন?

এরজন্য অ্যাপস ব্যবহার করতে হবে, 

আর যেতে হবে এই সাইটেঃ http://cellidfinder.com/
Share:

GET LATEST UPDATE by EMAIL